
Absolute beginner guide • MeshAdv Mini • Raspberry Pi
MESHADV MINI: START FROM ZERO.
Never used Linux? Never touched a Raspberry Pi? Don't know what SSH, SPI, UART or YAML mean? Good. This guide assumes you know none of it and walks you from a box of parts to a working Meshtastic node.
No coding requiredCopy-and-paste commandsDesktop or SSHTroubleshooting included
The MeshAdv Mini project specifically warns that the LoRa antenna must be connected before the board is powered. Powering the LoRa module without an antenna can damage it.
Before plugging power into the Raspberry Pi, stop and verify the LoRa antenna is attached.
What are we actually doing?
The Raspberry Pi is the little computer. The MeshAdv Mini is the radio HAT attached to it. The Pi runs meshtasticd, which is the Linux-native version of Meshtastic. You do not need to understand Linux internals to complete this guide.
What you need
PUT THESE THINGS ON THE TABLE.
Raspberry PiFor a simple compact build, Raspberry Pi Zero 2 W is a great match. Raspberry Pi 4 and 5 are also supported by the configuration tool.
MeshAdv MiniThe LoRa/GPS HAT made by Frequency Labs / Chris Myers.
Correct LoRa antennaFor a U.S. 915 MHz board, use a suitable 915 MHz antenna and attach it before power.
microSD cardThis stores Raspberry Pi OS and all of the software.
Correct Pi power supplyUse a power supply appropriate for the exact Raspberry Pi model.
Internet connectionWi-Fi or Ethernet is needed to install packages and the configuration tool.
Know what you're looking at
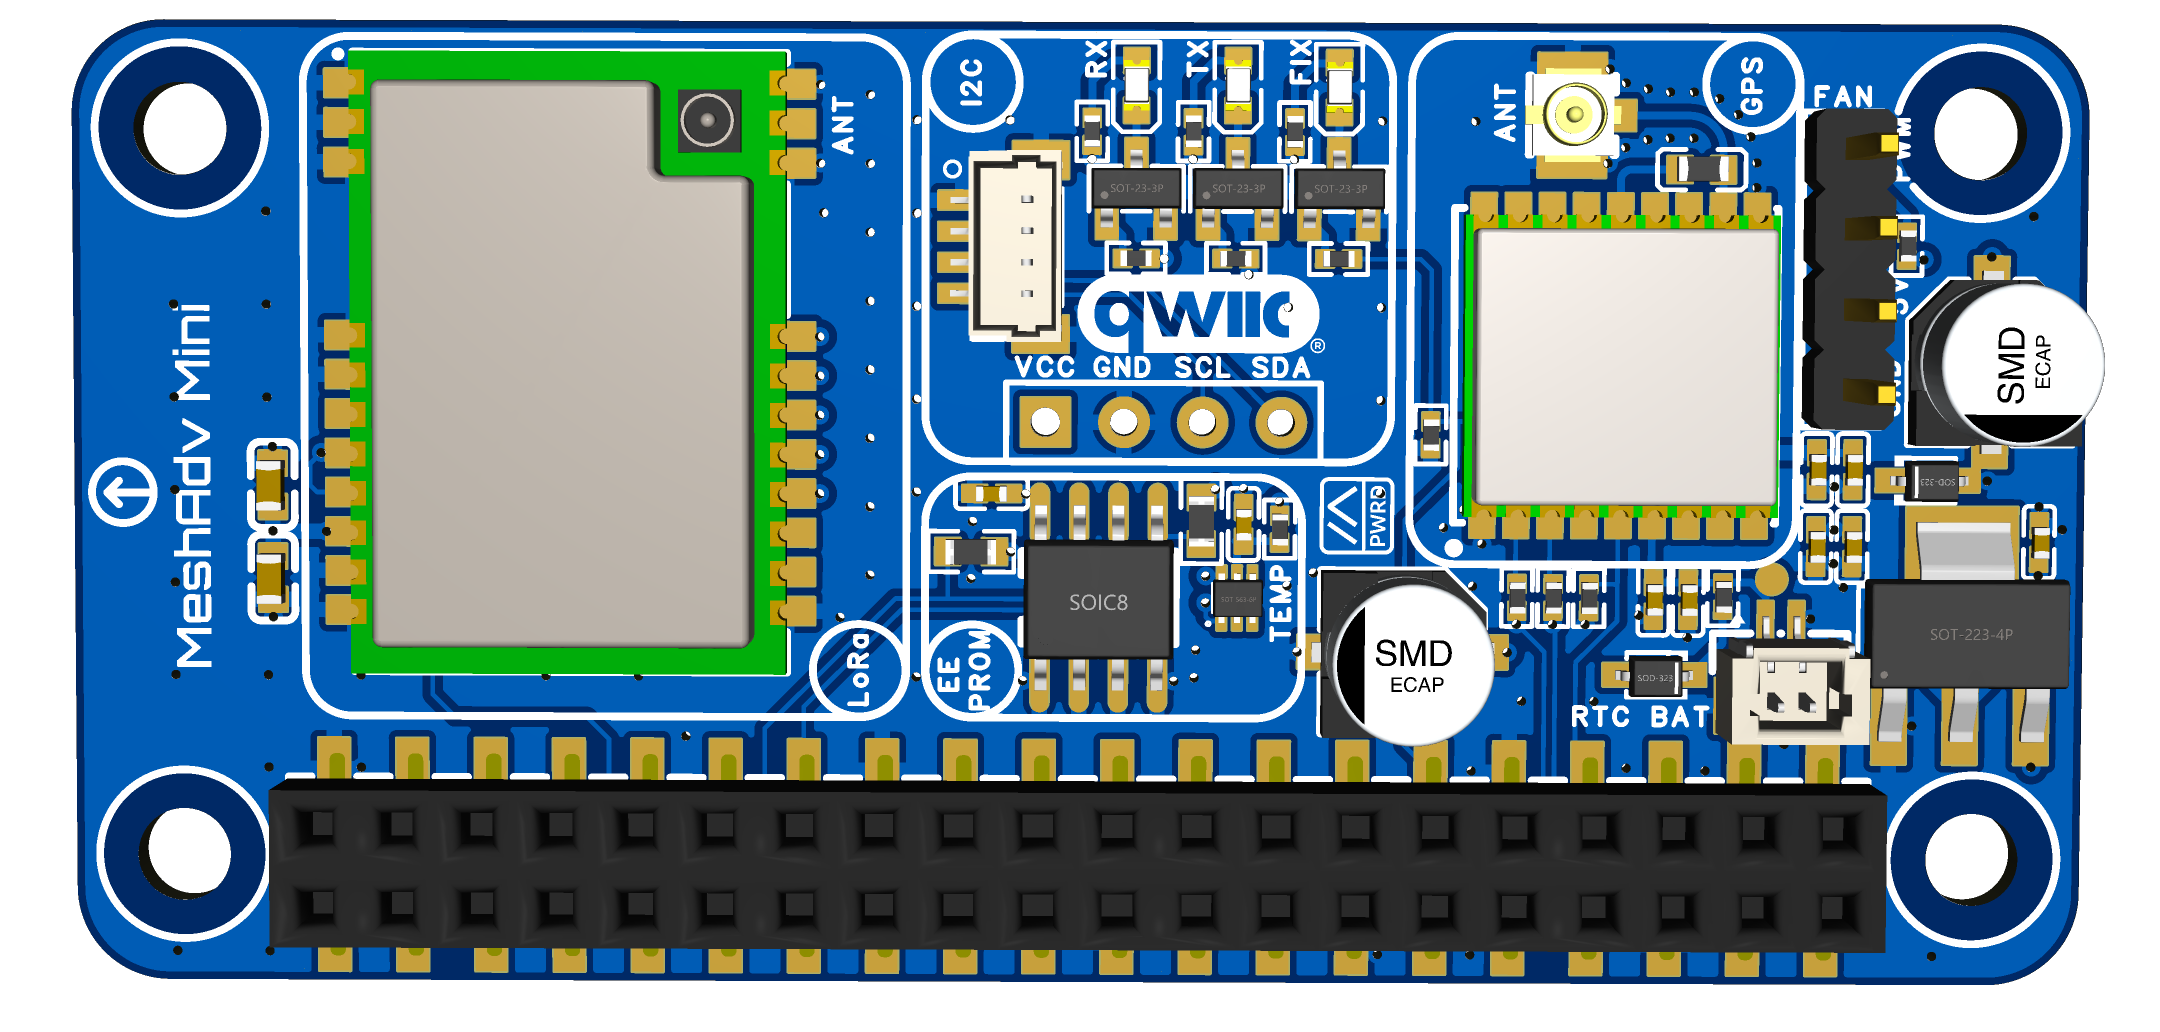
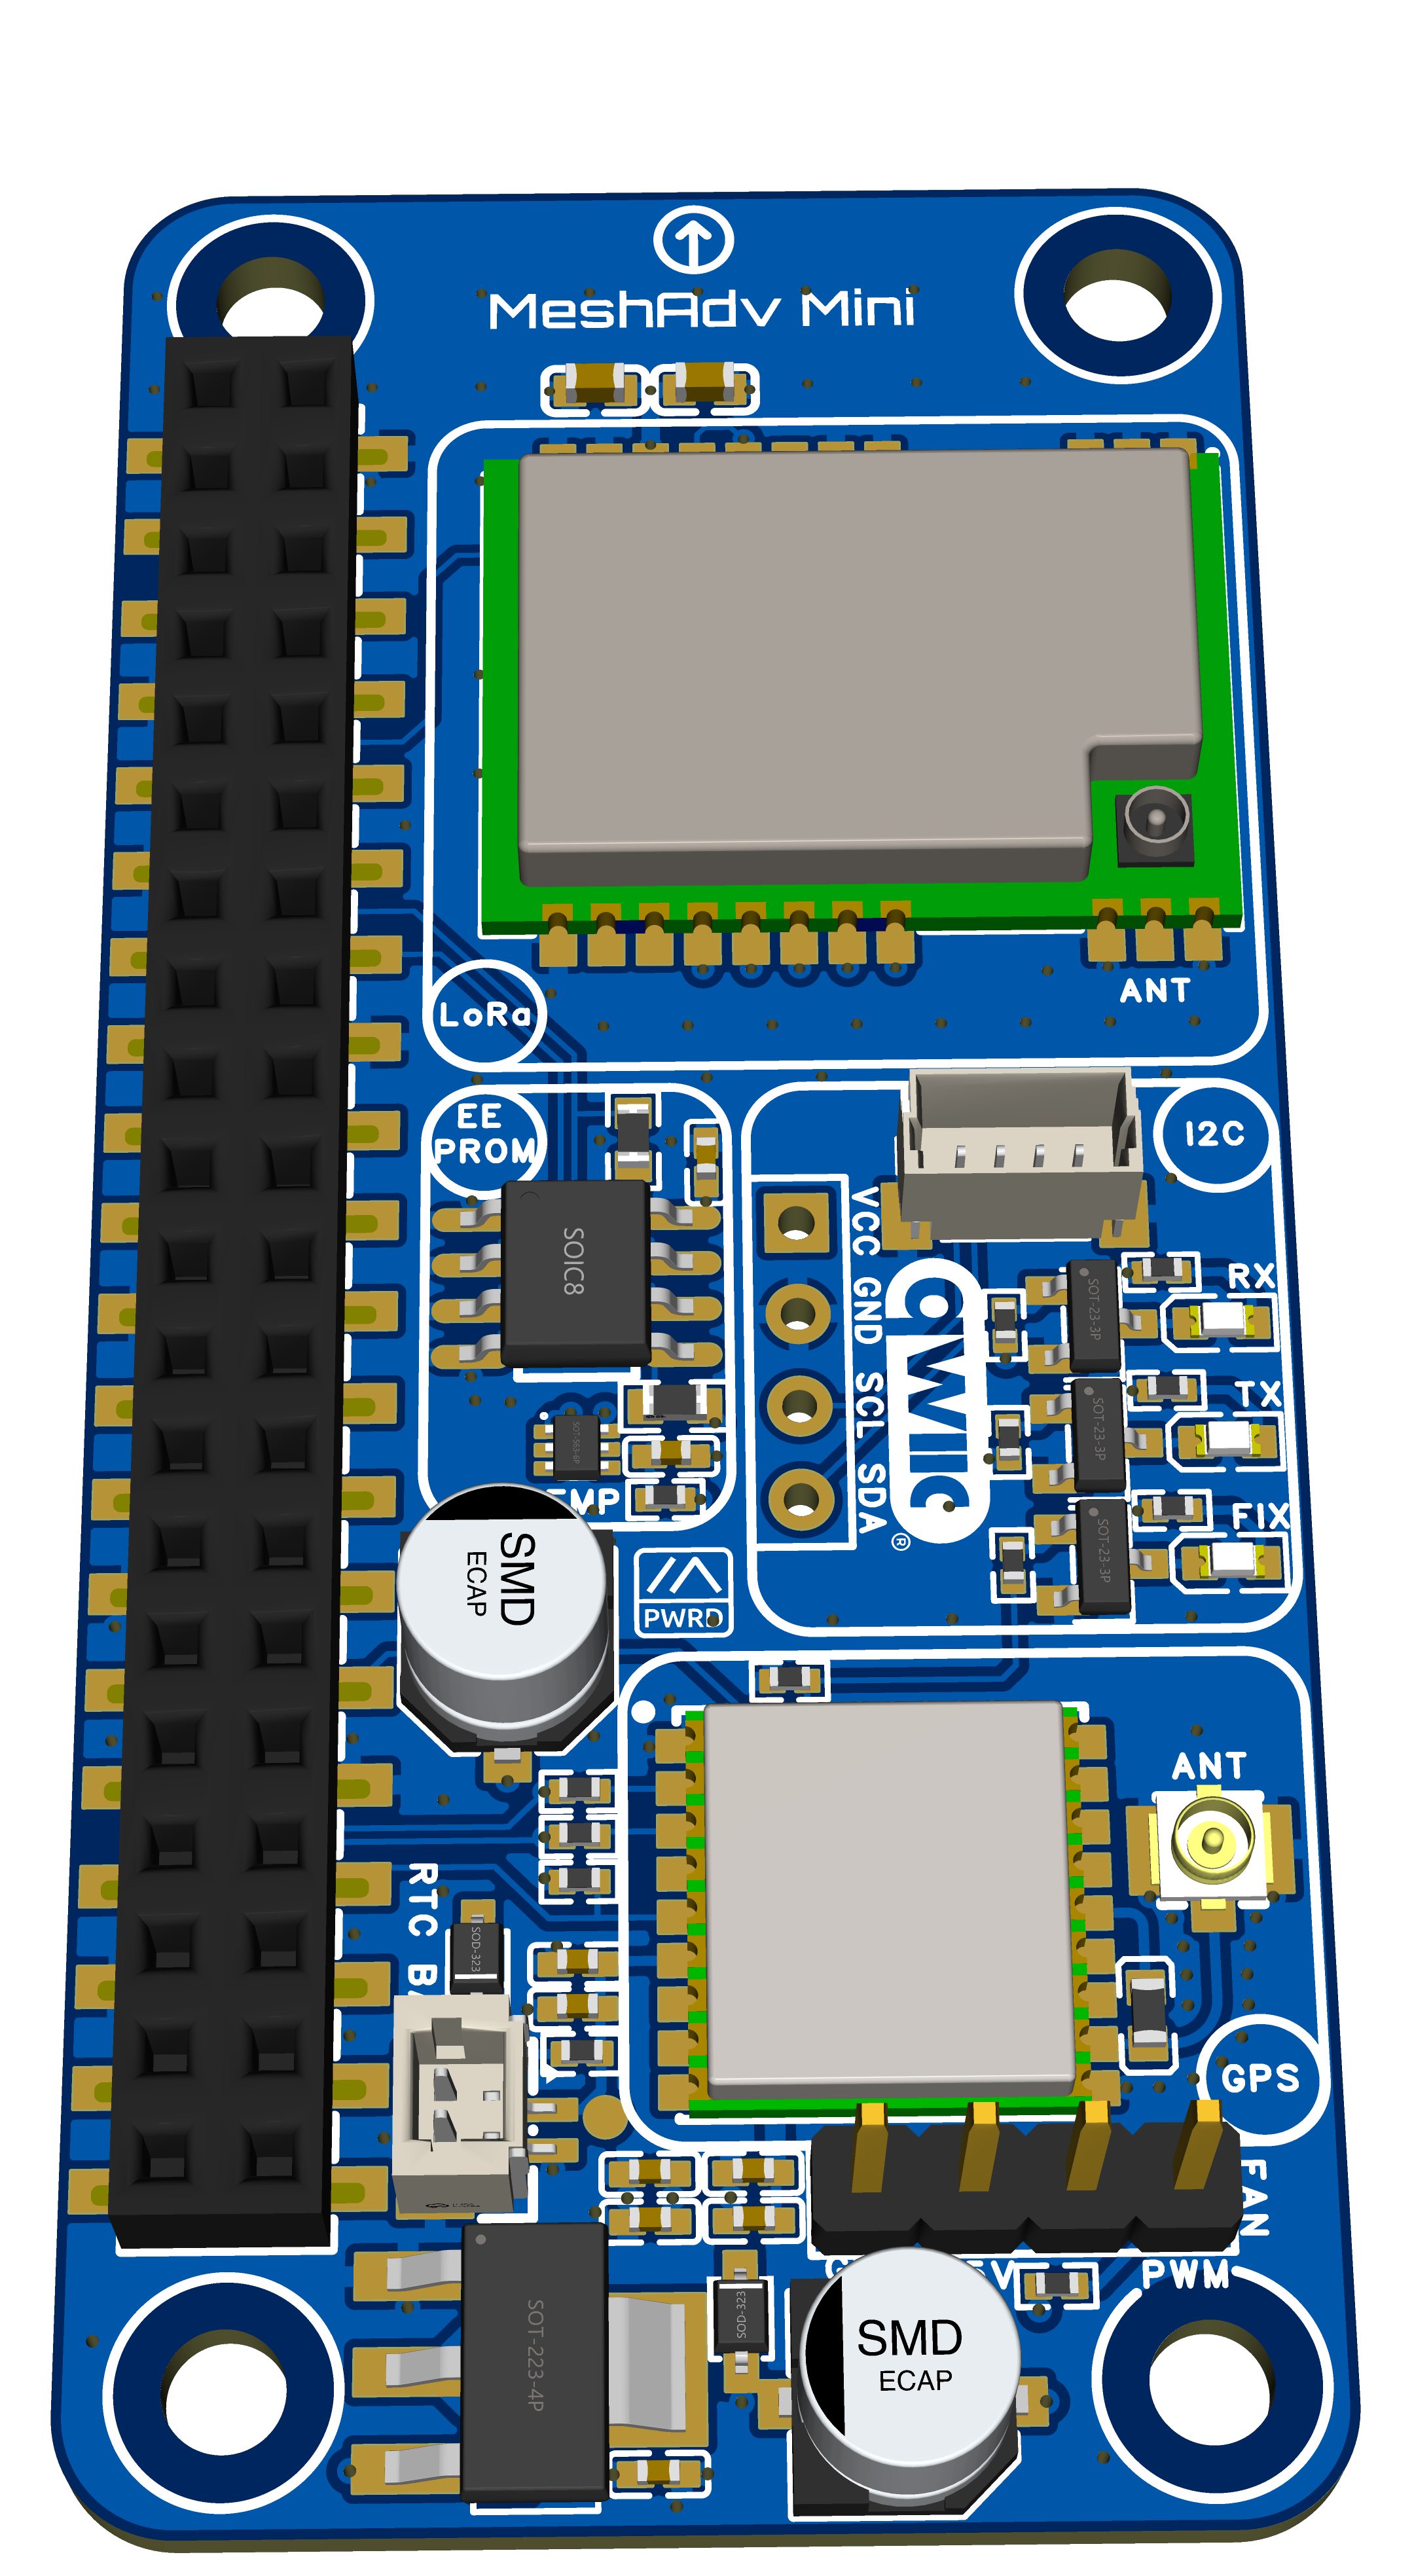
THE BOARD, WITHOUT THE ALPHABET SOUP.
1LoRa radio / antenna sideThis is the radio side of the project. The antenna warning matters here.
240-pin Raspberry Pi headerThis is how the HAT connects electrically to the Raspberry Pi.
3GPS hardwareThe Mini includes GPS support. We'll let the setup tool configure its UART settings.
4I²C / Qwiic expansionOptional sensor and accessory connections. Ignore them for your first setup.
Board images are from the MeshAdv Mini project repository. Component placement can change between revisions; the upstream project documentation is the source of truth.
1
Install Raspberry Pi OS
GIVE THE PI AN OPERATING SYSTEM.
Raspberry Pi OS is basically the Pi's equivalent of Windows or macOS. Use the official Raspberry Pi Imager to write a current Raspberry Pi OS image to your microSD card.
During Raspberry Pi Imager setup
✓ Set your Wi-Fi name and password if you're using Wi-Fi.
✓ Create a username and password you will remember.
✓ Give the Pi a simple hostname such as meshadv.
✓ Enable SSH if the Imager gives you that option.
What is SSH?
SSH is just a way to control the Raspberry Pi from another computer over your network. You type commands remotely instead of plugging a keyboard and screen into the Pi.
2
Install the hardware
PI OFF. HAT ON. ANTENNA ON. THEN POWER.
Shut the Raspberry Pi completely down and unplug it.
Carefully line up the MeshAdv Mini with the Raspberry Pi's 40-pin GPIO header.
Press the HAT straight down. Do not shift it over by one row of pins.
Connect the LoRa antenna.
Look at it again and verify the antenna is actually connected.
Only now connect power to the Raspberry Pi.
Do not install, remove or slide the HAT around while the Pi is powered.
3
Get to a terminal
THIS IS THE ONLY “LINUX-LOOKING” PART.
Using a monitor + keyboard?Boot the Pi normally and open the Terminal application.
Using SSH?Connect to the Pi using the hostname you created. A common example is meshadv.local.
Scary text?Totally normal. A terminal is just a text box where you tell the computer what to do.
4
Install the Frequency Labs helper
USE THE CONFIGURATION TOOL INSTEAD OF HAND-EDITING EVERYTHING.
The MeshAdv developer provides a configuration tool that supports the MeshAdv Mini and automatically chooses a graphical interface on a Raspberry Pi desktop or a text interface when you connect over SSH.
Copy this entire command, paste it into the terminal, and press Enter:
A lot of text will scroll by. That does not mean something is broken.
Start the tool
python3 ~/meshadv-config/meshadv-config.py
If you're on the Pi desktop, you should get the GUI. If you're using SSH/headless mode, you should get the terminal interface. Both expose the same setup functions.
5
Configure the radio
CLICK THESE IN THIS ORDER.
A. Install meshtasticd
Choose Install / Remove meshtasticd, then install it. For a first setup, use the Stable release channel unless you have a specific reason to test Beta, Alpha or Daily.
B. Enable SPI
Choose Enable SPI. SPI is how the Pi talks to the LoRa radio. You don't need to learn it; it simply needs to be on.
C. Enable I²C
Choose Enable I2C. This enables the bus used by additional hardware on the HAT.
D. Enable GPS / UART
Choose Enable GPS / UART. The tool knows that the Mini needs different GPS serial handling on Pi 5/500 than on earlier Pi models and writes the appropriate settings for you.
E. Set the HAT configuration
Choose Set Hat Config. The recommended Mini configuration is:
lora-MeshAdv-Mini-900M22S.yaml
The tool marks the recommended file with a star and can download a fresh Mini YAML from the Frequency Labs GitHub if it is missing.
See “Reboot required”?
That's expected after hardware settings change. Reboot before trying to diagnose anything.
sudo reboot
6
After reboot
OPEN THE TOOL AGAIN.
Your SSH window will disconnect during a reboot. Reconnect to the Raspberry Pi, then run:
python3 ~/meshadv-config/meshadv-config.py
Look at the status indicators. SPI, I²C and the selected HAT configuration should now reflect the settings you enabled.
7
Set the legal radio region
DO NOT SKIP THE REGION.
Meshtastic needs the correct LoRa region before normal radio use. In the configuration tool, install the Meshtastic Python CLI if the action requires it, then choose Set Region.
Operating in the United States?
Select the U.S. region setting. If this node is physically being operated somewhere else, choose the legal region for that location instead. Do not copy someone else's setting blindly.
Next choose Enable on Boot so meshtasticd starts whenever the Pi restarts.
Then choose Start Service.
8
The fun part
CHECK STATUS AND SEND A TEST MESSAGE.
Open Service Status. You want meshtasticd to show as running/active without a repeating fatal error.
Then use the configuration tool's Send Test Message action.
If the test message goes out: you're running a Linux-native Meshtastic node.
That is the whole first milestone. Do not start adding MQTT, dashboards, sensors, PPS timing and ten other services until basic radio operation is proven.
Something went sideways?
BEGINNER TROUBLESHOOTING.
Do not start changing random GPIO numbers or pasting old YouTube commands. Check the boring stuff first.
The LoRa radio isn't working
Verify the antenna is connected, SPI is enabled, the Mini HAT configuration is selected, you rebooted after enabling hardware interfaces, and meshtasticd is running.
I see “No config files found” or the Mini YAML is missing
Make sure meshtasticd is actually installed. Return to Set Hat Config; the configuration tool includes a download option for the Mini configuration file.
meshtasticd will not start
Open Service Status and read the error. Confirm SPI is enabled, the exact Mini config is active and the Pi was rebooted after configuration changes.
GPS isn't getting a position
Confirm Enable GPS / UART was run. GPS reception indoors can be poor, so test where the antenna has a clearer view of the sky. A first fix can take longer than later fixes.
The guide looks different from what I see on screen
MeshAdv Mini, the configuration tool, Raspberry Pi OS and Meshtastic are active projects. Use the upstream repository and official Meshtastic documentation as the current source of truth when an interface or installation process changes.
I found an old tutorial telling me to edit config.yaml manually
The MeshAdv repository still documents a manual path, but its current README points users to the configuration tool and current official Meshtastic Linux-native instructions first. Manual YAML editing is better treated as an advanced/fallback route.
Do not do these
THE FIVE EASY WAYS TO CREATE YOUR OWN PROBLEM.
✕ Do not power the LoRa module without its antenna.
✕ Do not install/remove the HAT while the Pi is powered.
✕ Do not copy GPIO values from a different HAT.
✕ Do not use a random region because a video used it.
✕ Do not assume an old installation video matches today's meshtasticd packaging.
✓ Get basic radio operation working before adding advanced services.
After the first message
THEN YOU CAN GET FANCY.
GPSUse the onboard GNSS hardware for position and timing.
Temperature + fanThe Mini includes temperature sensing and a 5V PWM fan header.
I²C / QwiicAdd compatible sensors and expansion hardware.
MQTTA Pi-based node is well suited to reliable network-connected MQTT deployments.
Remote administrationUpdate and maintain high-site or hard-to-reach infrastructure remotely.
PPS / time servicesAdvanced builds can use the GPS PPS output for precise timing work.
Credit & source of truth
THIS GUIDE SUPPLEMENTS THE PROJECT — IT DOESN'T REPLACE IT.
MeshAdv Mini is a project by Chris Myers / Frequency Labs. No Bars Club did not design or manufacture the hardware.
This No Bars Club page is written as a beginner translation of the current public project documentation. Hardware revisions and software installation methods can change. When this page and the upstream project disagree, use the current upstream documentation and report the mismatch so this guide can be corrected.